If you want to make sure that your bike is running smoothly and is safe to ride, the ABC Quick Check is just the thing. This easy check of your bike can identify potential issues that can often be easy to fix and make sure that your bike is safe. There may be some items that you are not familiar or comfortable repairing and so we added some options for getting the repairs done at the end.
The simple ABC’s you should check:
A is for air:
It’s more than just checking that there is air in your tires, it is checking to make sure that the wheels are rolling smoothly.
- Check the tire pressure by simply pressing firmly down on the tire with your thumb. Better yet use a tire pump with a built in gauge to more accurately check the pressure. Check the sidewall of your tires for the recommended maximum pressure and if you are riding on the streets, pump those tires up to the max. While you are looking for the pressure check the sidewalls of your tires to make sure that they are not beginning to crack and breakdown. If they are you may want to look at replacing them. If your pressure is too low you not only have to work harder and you also risk getting a flat if you hit a pothole or bump.
- Check the tires to make sure there is no glass or other sharp objects protruding from the tread. You may just find and remove something that was destined to become an inconvenient flat.
- Check to see that your wheels are straight and true. Pick up your bicycle and spin each wheel. The wheel should spin straight and not rub the brakes. If it is rubbing on the brakes you need to get this attended to and you likely need some help.
- Check that the wheel bearings are tight. Grab the wheel and try to move it from side to side. If there is movement the bearing in your wheel may be lose. This can result in a potentially expensive repair or might even require you to replace whole wheel. Once again you may need some help.
B is for Brakes and Bars:
Your brakes are the most important safety item on your bike and you want to make sure that they are at their best.
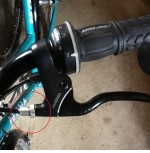
- Start by pulling the brake levers tightly towards the bars. You should be at least a finger width of space between the lever and handle grip. If the lever pulls all the way back and touches your handlebars it cannot possibly be providing a Barrel adjusters maximum braking force and needs to be adjusted. You may be able to make the needed adjustment using the barrel adjusters which are most often located on the brake handle, (sometimes on the brakes) by turning these counter clockwise to shorten the brake cable length and improve the situation. Eventually however you will need to make adjustments to the brake cable.
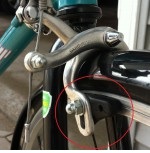
- Now check that the brake pads are making full contact with the rims of your wheels. Pull the brake handle and check visually. If they are aligning above or below the rim you will need to loosen the brake pad mounting bolt and adjust them.
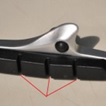
- At the same time check the brake pads for wear. Worn pads will reduce your braking power and could even damage your rims if left too long. Brakes pads have wear indicators just like the tread on car tires. When these are almost worn away or are not visible it may be time to replace the brake pads.
- Now let’s check the bars. Pull the front brake fully and try rocking your bike back and forth. There should no movement in the headset (steering). While you still have the front brake engaged, try pushing down on the bars and make sure that they do not move or rotate. If they do you will need to tighten the pinch bolt that holds them in place.
- Now stand in front of your bicycle with the front wheel held tightly between your legs. Try and twist the handle bars from side to side. If the bars twist you will need to tighten the stem bolt or the pinch bolts depending on what kind of headset you have.
C is for Chain and Crank:
This is not a safety issue but it is a maintenance issue. The chain and crank are integral parts of your drive train and need a bit of maintenance to ensure that they are operating smoothly.
- Check to make sure your chain is clean, lubricated and running smoothly. A dirty chain will cause increased wear on the more expensive components of your drive train and make for costly repairs.
- You can clean your chain with a rag or you can get a brush and some chain cleaner (try the environmentally friendly brand and remember that solvent is not a good cleaner for your chain) to clean it thoroughly.
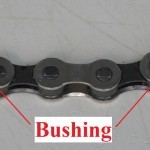
- Once the chain is dry, lubricate it. You should always use a lubricant designed for bicycles. WD-40 is not a lubricant and motor oil will only attract more dirt. If you are going to be riding in rain, a wet lube is a better choice. And don’t pore the lubricant all over your chain. Too much will attract more dirt and turn your chain (and you pant leg) into a greasy mess. The only area that needs lubrication are the bushings or points along the chain where it needs to pivot. Simply place a single drop on each bushing, let it sit for 5 minutes and then wipe any excess away with a rag.
- Finally check the crank by grabbing the pedal arm and trying to wiggle it back and forth. There should not be any play in the bearings of the bottom bracket. If there is your bike definitely needs attention and a few special tools are likely required.
Quick – is for quick releases:
If your bike has quick releases on the wheels, you need to make sure they are tight and not easily opened. Even if you have bolt on wheels it is a good idea to check them to ensure that they are not loose.
Final “Check”:
As a final check, pick your bicycle up 10 cm (three to four inches) off the ground and drop it. If there are any rattles or something falls off, your bike requires attention.
Here is a link to a video of the ABC Quick Check. It is not as detailed as the description above so there are a few other items to check, but it should help in the basic understanding of the process.
Need repairs?
If you have avoided any maintenance for years and find that your bike in need of more than some simple maintenance, you have a few option:
- Do it yourself. There are lots of on-line resources that can help you do most repairs provided you have the tools and a bit of a can do attitude.
- A better option is to connect with one of the many community bike shops around Winnipeg. They won’t fix your bike for you, but volunteers that have a background in bicycle repair will help you to do the repairs. In some cases they will also be able to provide used parts when needed. You get to learn more about your bike and at the same time get your bike repaired at minimal cost (you may need to buy some parts and donations are always welcome) if not free. For more information on the community bike shops in Winnipeg visit the WRENCH.
- You can take you bike in for service at your local bike shop.